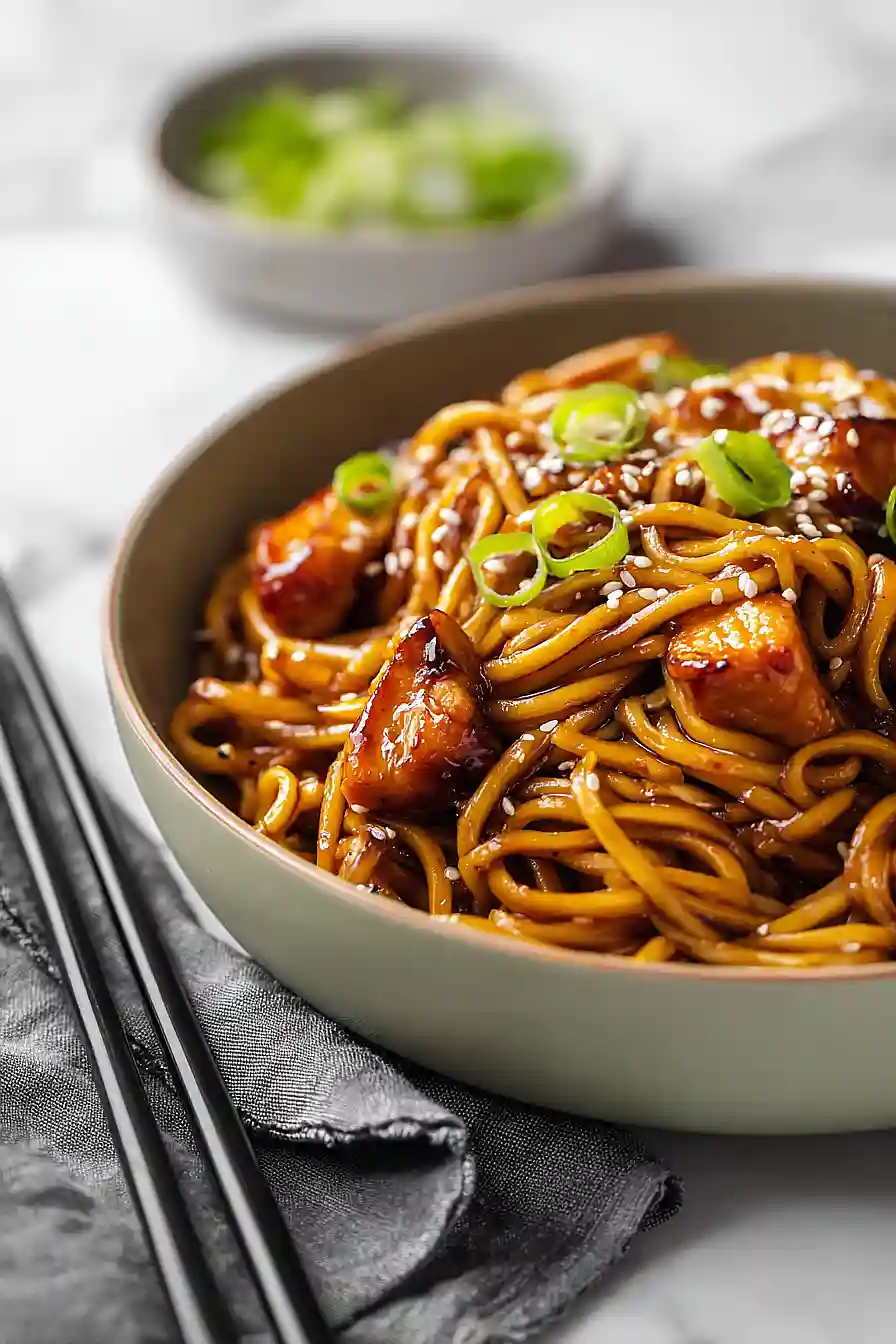
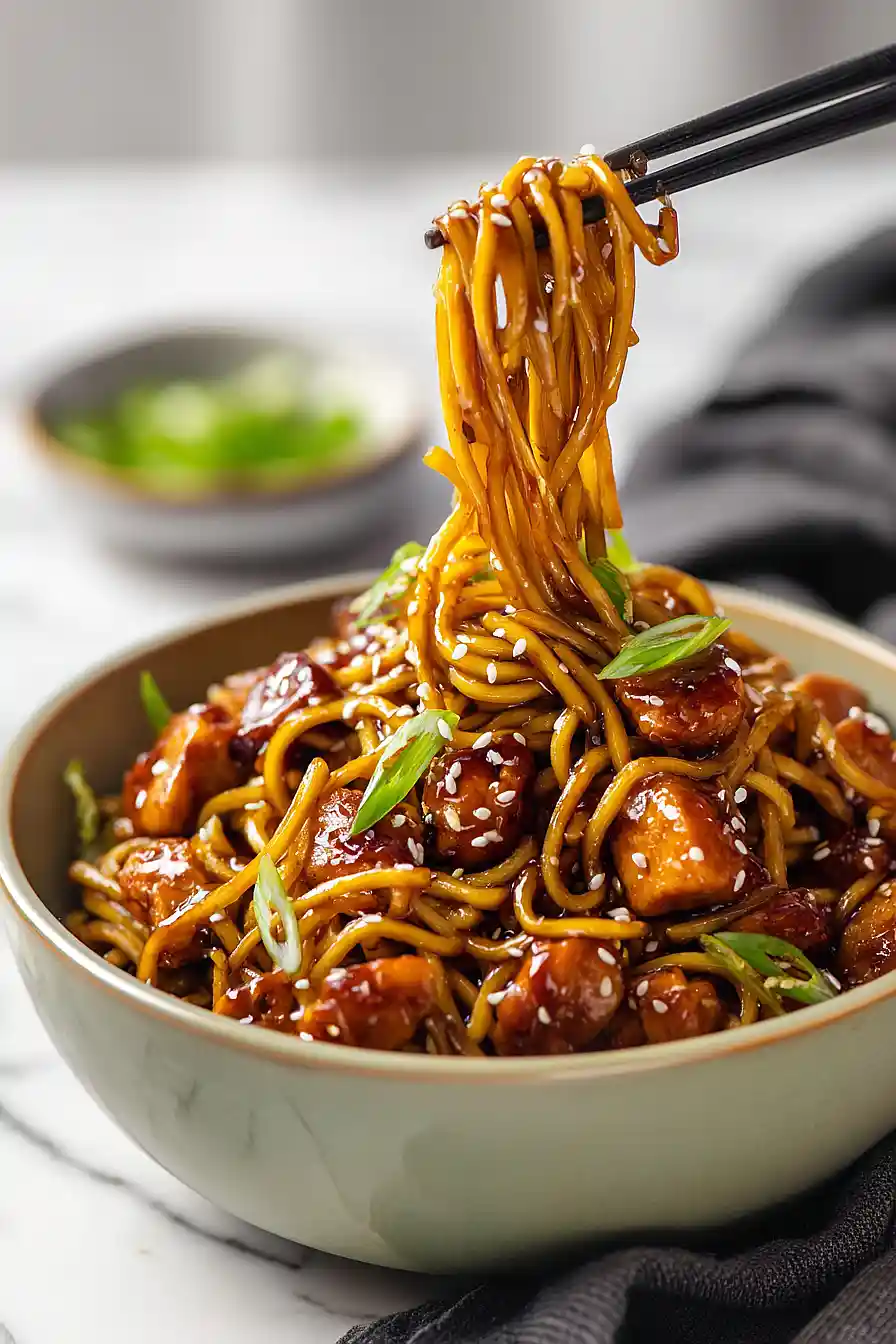
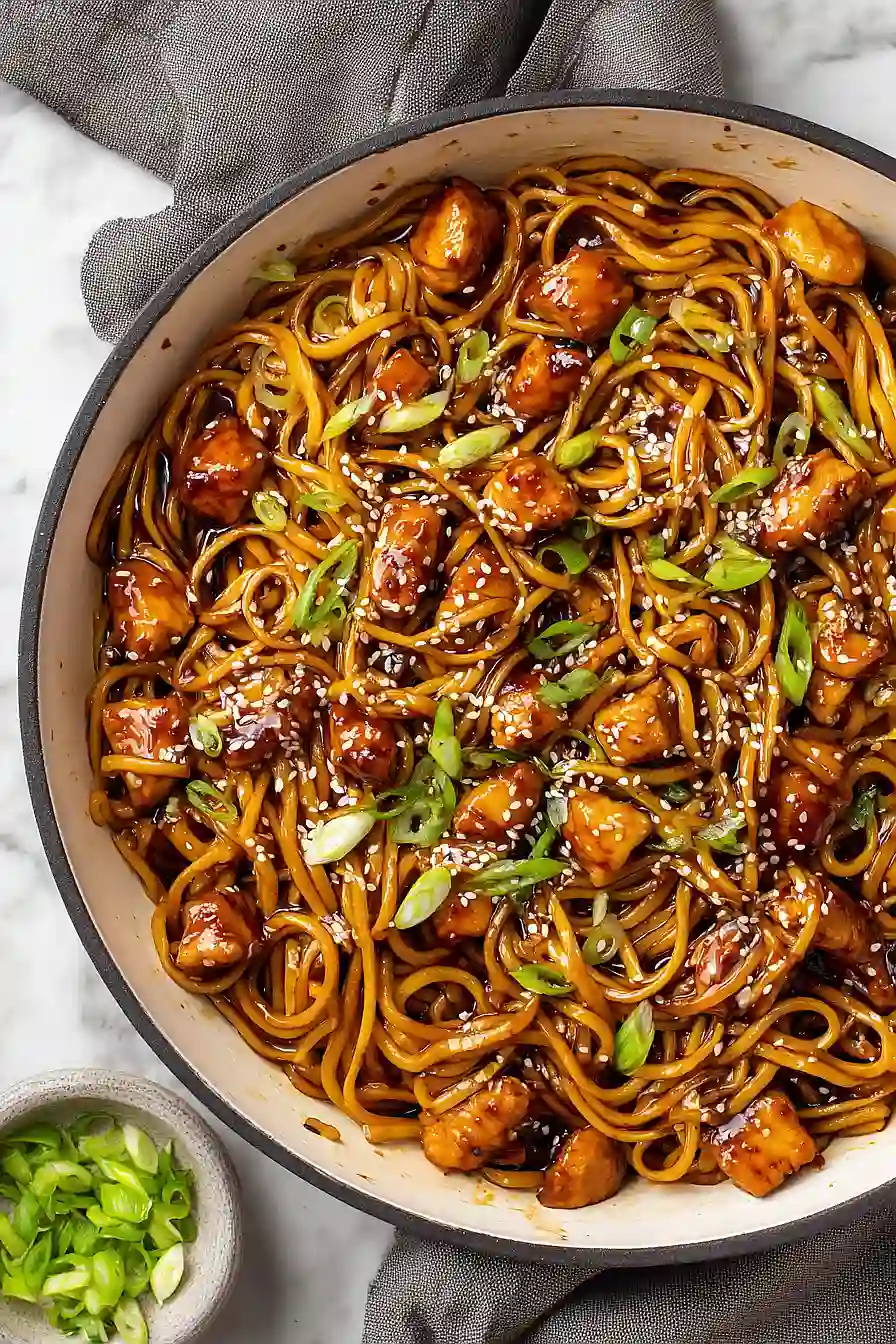
Here are my teriyaki chicken noodle bowls, with tender bite-sized chicken pieces coated in a sweet and savory homemade teriyaki sauce, served over spaghetti and topped with green onions and toasted sesame seeds.
These noodle bowls have become our go-to weeknight dinner when we’re craving takeout but want something healthier and more budget-friendly. My kids actually cheer when I tell them this is what’s for dinner, and the whole thing comes together in about 30 minutes.
Why You’ll Love These Teriyaki Chicken Noodle Bowls
- Quick weeknight dinner – Ready in just 20-30 minutes, this recipe is perfect for those busy evenings when you need something fast but don’t want to sacrifice flavor.
- Better than takeout – You can make restaurant-quality teriyaki chicken at home with ingredients you probably already have in your pantry, and it tastes fresher too.
- Flexible noodle options – Use whatever noodles you have on hand – spaghetti, udon, rice noodles, or yakisoba all work great in this recipe.
- Simple homemade sauce – The teriyaki sauce comes together in minutes with basic ingredients, and you’ll know exactly what’s going into your meal without any preservatives or additives.
- Family-friendly – The sweet and savory flavors appeal to both kids and adults, making it an easy dinner win for the whole family.
What Kind of Chicken Should I Use?
For this teriyaki chicken noodle bowl, boneless, skinless chicken breasts are called for, but you can easily swap in chicken thighs if that’s what you have on hand. Thighs tend to be a bit more forgiving since they’re harder to overcook and stay juicier, plus they’re usually less expensive. If you’re using breasts, try to cut them into evenly-sized cubes so they cook at the same rate – aim for about 1-inch pieces. Whether you go with breasts or thighs, make sure your chicken is at room temperature before cooking, as this helps it cook more evenly and get that nice golden color when it hits the pan.
Options for Substitutions
This recipe is pretty forgiving when it comes to swaps, so here are some options if you need them:
- Chicken breasts: Chicken thighs work great here and actually stay more tender during cooking. You can also use pork tenderloin or even firm tofu for a vegetarian option – just adjust the cooking time accordingly.
- Soy sauce: If you need a gluten-free option, use tamari instead. Coconut aminos work too, though they’re a bit sweeter, so you might want to reduce the honey slightly.
- Cider vinegar: Rice vinegar is actually more traditional for teriyaki and makes a great swap. White vinegar works in a pinch, though it’s a bit sharper.
- Fresh ginger: You can use 1 teaspoon of ground ginger instead of fresh, but add it to the sauce rather than cooking it with the garlic since ground ginger can burn easily.
- Honey: Brown sugar, maple syrup, or agave nectar all work well as sweeteners here. Start with the same amount and adjust to your taste.
- Pasta: The recipe lists several noodle options already, but really any long noodle works – even regular spaghetti or linguine from your pantry will do the job just fine.
Watch Out for These Mistakes While Cooking
The biggest mistake when making teriyaki chicken is adding the sauce too early, which can cause the chicken to steam instead of getting those nice browned edges – always brown the chicken first, then add your sauce.
Overcrowding the pan is another common error that leads to rubbery chicken, so if you’re doubling the recipe, cook the chicken in batches to ensure each piece gets proper contact with the hot surface.
Don’t skip mixing that cornstarch slurry (the cornstarch and water mixture) before adding it to the sauce, as dry cornstarch will clump up and create an uneven, lumpy texture instead of a smooth glaze.
Finally, have your cooked noodles ready to go before you start cooking the chicken – teriyaki sauce thickens quickly, and you don’t want it sitting around getting gummy while you’re still boiling pasta.
What to Serve With Teriyaki Chicken Noodle Bowls?
These noodle bowls are pretty filling on their own, but I love adding some quick stir-fried vegetables on the side like broccoli, snap peas, or bell peppers. A simple cucumber salad with rice vinegar and a pinch of sugar makes a nice cool contrast to the warm, savory noodles. If you want to bulk things up even more, some steamed edamame sprinkled with sea salt is always a good choice, or you could serve some crispy vegetable spring rolls for dipping in extra teriyaki sauce. For a lighter option, try some seaweed salad or a bowl of miso soup to start the meal.
Storage Instructions
Store: Keep your teriyaki chicken and noodles in separate airtight containers in the fridge for up to 4 days. I like to store them separately because the noodles can get a bit mushy if they sit in the sauce too long, but you can totally store them together if that’s easier for you.
Freeze: The teriyaki chicken freezes great on its own for up to 3 months in a freezer-safe container. I usually skip freezing the noodles since they don’t hold up as well, and it’s quick enough to cook fresh noodles when you’re ready to eat.
Reheat: Warm up the chicken in the microwave or on the stovetop over medium heat until heated through. If you stored the noodles separately, you can toss them in some hot water for a minute to freshen them up, then mix everything together and enjoy.
| Preparation Time | 10-15 minutes |
| Cooking Time | 10-15 minutes |
| Total Time | 20-30 minutes |
| Level of Difficulty | Easy |
| Servings | 4 servings |
Estimated Nutrition
Estimated nutrition for the whole recipe (without optional ingredients):
- Calories: 1300-1500
- Protein: 80-95 g
- Fat: 18-26 g
- Carbohydrates: 185-210 g
Ingredients
For the chicken:
- 3 tbsp cornstarch
- 1.5 lb chicken breasts (cut into 1-inch bite-sized cubes)
- 1.5 tbsp oil (I use Bertolli Extra Light Olive Oil)
- 1/2 tsp salt
- 1/2 tsp black pepper
For the sauce:
- 1/3 cup soy sauce (I prefer Kikkoman for the best salt balance)
- 1/4 cup water
- 1/4 cup cider vinegar
- 2.5 tbsp honey (adds a beautiful glossy sheen to the sauce)
- 3 garlic cloves (freshly minced for the most pungent aroma)
- 1 tbsp ginger (finely grated, about 1/8-inch pieces)
- 1/2 tsp red pepper flakes (for a subtle spicy finish)
- 1 tbsp cornstarch
- 1 tbsp water
For the assembly:
- 12 oz spaghetti (I always use Barilla for the perfect al dente texture)
- 3 green onions (thinly sliced)
- 1.5 tbsp sesame seeds (toasted to bring out a deeper nutty flavor)
Step 1: Prepare Mise en Place and Start Pasta
- 3 garlic cloves, minced
- 1 tbsp ginger, finely grated
- 3 green onions, thinly sliced
- 1.5 tbsp sesame seeds
While you’re gathering ingredients, bring a large pot of salted water to a boil for the spaghetti.
Mince the garlic cloves finely and grate the ginger into small, uniform pieces—this ensures even distribution of flavor throughout the sauce.
Slice the green onions and set aside for garnish.
Toast the sesame seeds in a dry skillet over medium heat for 2-3 minutes, stirring frequently until fragrant and golden, then transfer to a bowl.
This toasting step brings out a deeper, nuttier flavor that makes a real difference in the final dish.
Step 2: Season and Coat Chicken
- 1.5 lb chicken breasts, cut into 1-inch cubes
- 3 tbsp cornstarch
- 1/2 tsp salt
- 1/2 tsp black pepper
Pat the chicken cubes dry with paper towels—this helps them brown better and develop a golden crust.
In a shallow bowl, combine the 3 tablespoons cornstarch with the salt and black pepper, then toss the chicken cubes in this mixture until evenly coated.
Let the coated chicken sit for a moment while you heat your oil.
I like to do this coating right before cooking so the cornstarch doesn’t absorb moisture from the chicken and become clumpy.
Step 3: Brown the Chicken
- 1.5 tbsp oil
- coated chicken from Step 2
Heat the oil in a large skillet over medium-high heat until shimmering.
Working in batches if needed to avoid crowding, add the coated chicken and let it sit undisturbed for 2-3 minutes before stirring.
Continue cooking for another 3-4 minutes, stirring occasionally, until the chicken is golden brown on all sides and cooked through.
The browning develops flavor through the Maillard reaction, creating a delicious caramelized exterior.
Step 4: Build and Thicken the Teriyaki Sauce
- 1/3 cup soy sauce
- 1/4 cup water
- 1/4 cup cider vinegar
- 2.5 tbsp honey
- 3 garlic cloves, minced
- 1 tbsp ginger, finely grated
- 1/2 tsp red pepper flakes
- 1 tbsp cornstarch
- 1 tbsp water
- cooked chicken from Step 3
While the chicken finishes cooking, combine the soy sauce, water, cider vinegar, honey, minced garlic, grated ginger, and red pepper flakes in a bowl, whisking until the honey dissolves.
Once the chicken is golden and cooked through, pour this sauce over it and simmer for 4-5 minutes, stirring occasionally, to allow the flavors to meld and the chicken to absorb the sauce.
In a small bowl, whisk together the 1 tablespoon cornstarch with 1 tablespoon water to create a slurry.
Pour the slurry into the simmering sauce and stir constantly for 1-2 minutes until the sauce thickens into a glossy, coat-able consistency.
Step 5: Cook Pasta and Assemble Bowls
- 12 oz spaghetti
- teriyaki chicken and sauce from Step 4
By now, your pasta water should be boiling; add the spaghetti and cook according to package directions until al dente.
Reserve about 1/2 cup of pasta water before draining.
Divide the cooked pasta among serving bowls, then ladle the teriyaki chicken and sauce generously over each portion.
Toss gently to coat the noodles with the glossy sauce, adding a splash of reserved pasta water if needed to loosen the sauce slightly.
Step 6: Garnish and Serve
- toasted sesame seeds from Step 1
- sliced green onions from Step 1
Top each bowl with a generous sprinkle of the toasted sesame seeds and a handful of the sliced green onions.
The sesame seeds add a wonderful textural contrast and nutty depth, while the green onions provide a fresh, bright finish that balances the rich, savory sauce.

Mouthwatering Teriyaki Chicken Noodle Bowls
Ingredients
Method
- While you're gathering ingredients, bring a large pot of salted water to a boil for the spaghetti. Mince the garlic cloves finely and grate the ginger into small, uniform pieces—this ensures even distribution of flavor throughout the sauce. Slice the green onions and set aside for garnish. Toast the sesame seeds in a dry skillet over medium heat for 2-3 minutes, stirring frequently until fragrant and golden, then transfer to a bowl. This toasting step brings out a deeper, nuttier flavor that makes a real difference in the final dish.
- Pat the chicken cubes dry with paper towels—this helps them brown better and develop a golden crust. In a shallow bowl, combine the 3 tablespoons cornstarch with the salt and black pepper, then toss the chicken cubes in this mixture until evenly coated. Let the coated chicken sit for a moment while you heat your oil. I like to do this coating right before cooking so the cornstarch doesn't absorb moisture from the chicken and become clumpy.
- Heat the oil in a large skillet over medium-high heat until shimmering. Working in batches if needed to avoid crowding, add the coated chicken and let it sit undisturbed for 2-3 minutes before stirring. Continue cooking for another 3-4 minutes, stirring occasionally, until the chicken is golden brown on all sides and cooked through. The browning develops flavor through the Maillard reaction, creating a delicious caramelized exterior.
- While the chicken finishes cooking, combine the soy sauce, water, cider vinegar, honey, minced garlic, grated ginger, and red pepper flakes in a bowl, whisking until the honey dissolves. Once the chicken is golden and cooked through, pour this sauce over it and simmer for 4-5 minutes, stirring occasionally, to allow the flavors to meld and the chicken to absorb the sauce. In a small bowl, whisk together the 1 tablespoon cornstarch with 1 tablespoon water to create a slurry. Pour the slurry into the simmering sauce and stir constantly for 1-2 minutes until the sauce thickens into a glossy, coat-able consistency.
- By now, your pasta water should be boiling; add the spaghetti and cook according to package directions until al dente. Reserve about 1/2 cup of pasta water before draining. Divide the cooked pasta among serving bowls, then ladle the teriyaki chicken and sauce generously over each portion. Toss gently to coat the noodles with the glossy sauce, adding a splash of reserved pasta water if needed to loosen the sauce slightly.
- Top each bowl with a generous sprinkle of the toasted sesame seeds and a handful of the sliced green onions. The sesame seeds add a wonderful textural contrast and nutty depth, while the green onions provide a fresh, bright finish that balances the rich, savory sauce.