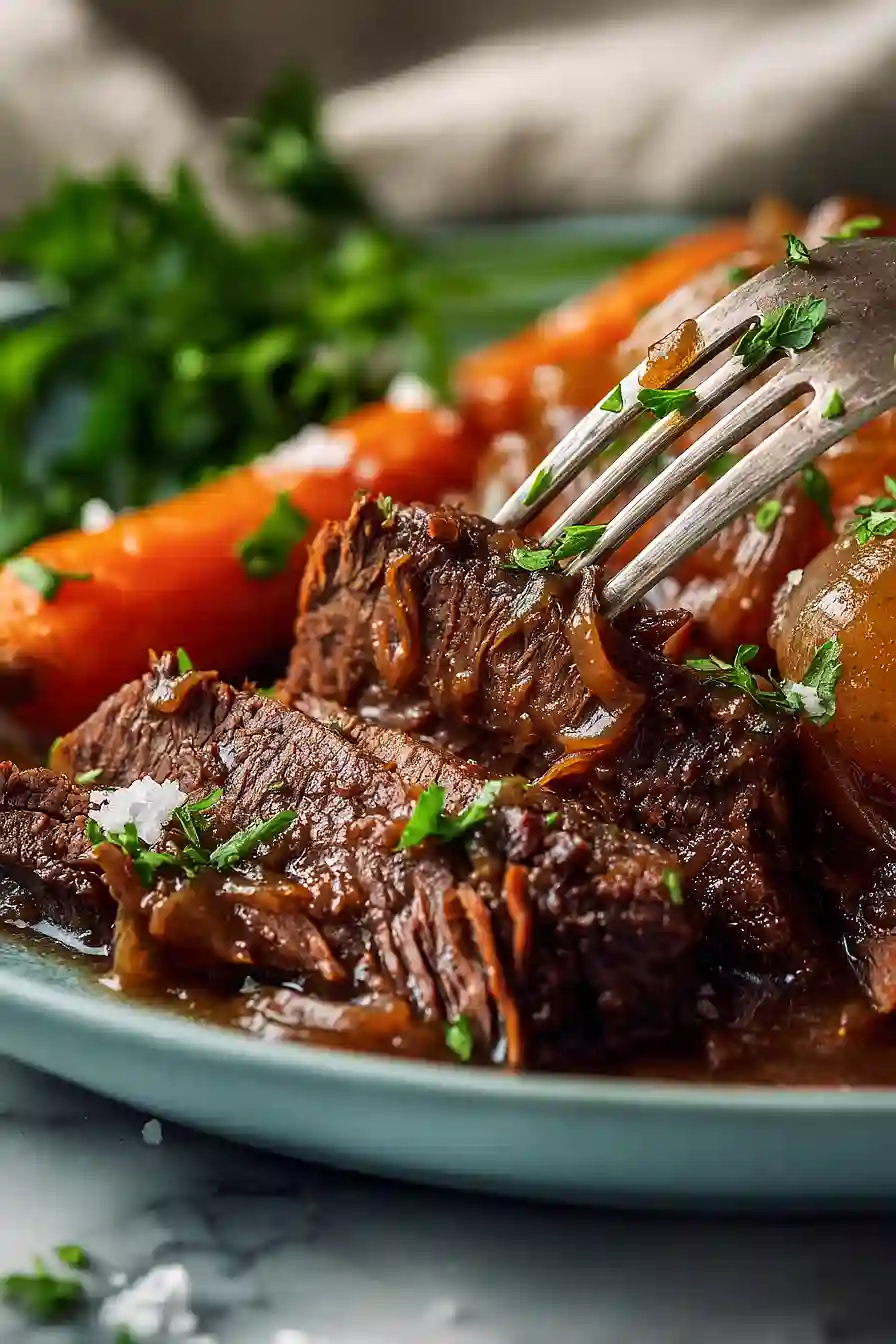
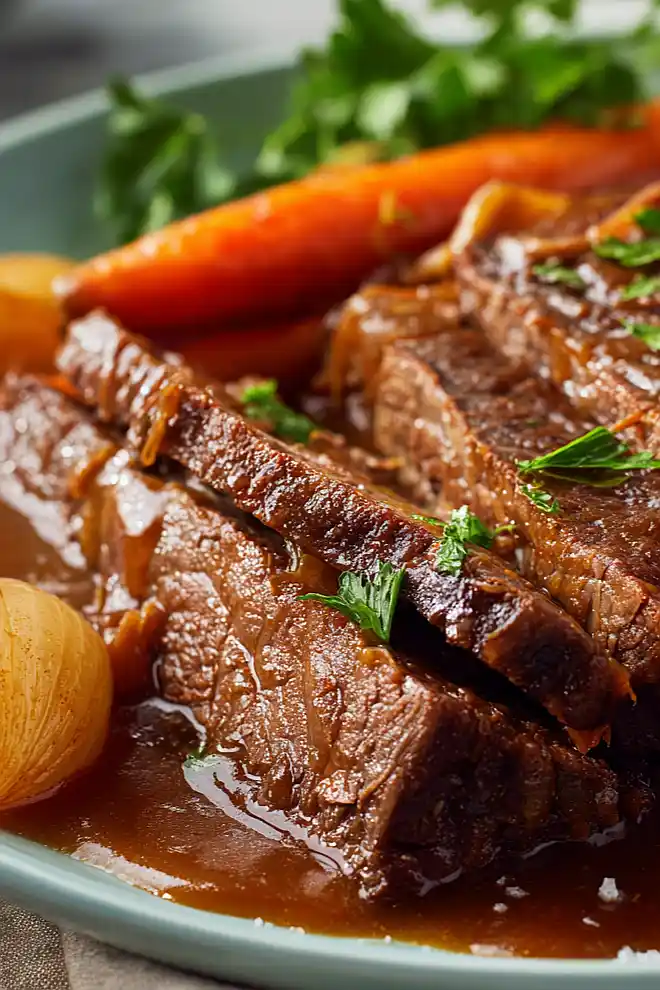
Here is my grandpa’s brisket recipe, with tender meat that falls apart, caramelized onions, carrots, and a rich gravy made with chicken broth, tomato paste, and warming spices.
This brisket has been in my family for generations, and it’s the dish everyone asks me to bring to holiday dinners. My grandpa used to make it every Sunday, and now I love making it for my own family. The house smells incredible while it cooks, and the leftovers (if there are any!) make amazing sandwiches the next day.

Why You’ll Love This Brisket
- Family recipe with heart – There’s something special about making a dish that’s been passed down through generations, and this brisket brings that comforting, nostalgic feeling to your table.
- Melt-in-your-mouth tender – The long, slow cooking time transforms the brisket into incredibly tender meat that practically falls apart with your fork.
- Simple, everyday ingredients – You won’t need to hunt down any fancy items—just onions, carrots, garlic, and pantry staples you likely already have on hand.
- Perfect for feeding a crowd – This recipe makes enough to serve your whole family with plenty of leftovers, making it ideal for Sunday dinners or holiday gatherings.
- Minimal hands-on time – Once you get it in the oven, the brisket does its thing while you relax or prep other dishes.
What Kind of Brisket Should I Use?
When you’re at the butcher counter, you’ll typically see two cuts of brisket: the flat cut (also called first cut) and the point cut (or second cut). The flat cut is leaner and slices more evenly, which is why it’s the go-to for this recipe and most traditional brisket dishes. The point cut has more marbling and fat, which makes it juicier but a bit harder to slice neatly. Either cut will give you tender, flavorful results after the long cooking time, so don’t stress too much if your store only has one option available. Just make sure your brisket has a nice fat cap on one side – you’ll want to keep that on during cooking to help keep the meat moist.
Options for Substitutions
This classic brisket recipe has some room for swaps if you need them:
- Brisket: The brisket itself is pretty essential here – it’s what makes this recipe special. Stick with first or flat cut for the best results, as other cuts won’t give you that same tender, sliceable texture.
- Yellow onions: You can use white or sweet onions instead of yellow. Sweet onions will make the dish a bit milder, while white onions add a sharper bite.
- Chicken broth: Beef broth works great here too and actually adds a richer, meatier flavor. You can also mix half chicken and half beef if that’s what you have on hand.
- Vegetable oil: Any neutral oil like canola or grapeseed works fine. You could even use olive oil, though it’ll add a slight flavor.
- Ground white pepper: Black pepper is a perfectly fine substitute. The flavor is a bit stronger, so you might want to use just a pinch less.
- Carrots: Parsnips make a nice swap if you want something a little sweeter, or you can add celery alongside or instead of carrots for a different flavor profile.
Watch Out for These Mistakes While Cooking
The biggest mistake people make with brisket is slicing it with the grain instead of against it, which results in tough, chewy meat – look for the lines running through the meat and cut perpendicular to them for tender slices.
Skipping the browning step might seem like a time-saver, but those caramelized bits on the bottom of the pot add serious flavor to your sauce, so make sure each side gets a good sear before moving on.
Don’t be tempted to crank up the oven temperature to speed things along – brisket needs low and slow cooking to break down the tough connective tissue, and rushing it will leave you with meat that’s dry and hard to chew.
Finally, resist the urge to skip the resting period after the first bake when you slice the meat, as cutting it too soon can cause all those delicious juices to run out onto your cutting board instead of staying in the brisket.
What to Serve With Brisket?
This brisket is perfect for a family dinner, and I love serving it with creamy mashed potatoes or buttered egg noodles to soak up all that delicious gravy. Roasted root vegetables like parsnips, turnips, or more carrots are a natural fit since they echo the flavors already in the dish. A simple side of sautéed green beans or roasted Brussels sprouts adds a nice fresh contrast to the rich, tender meat. Don’t forget some crusty bread or challah on the side for mopping up every bit of sauce on your plate!
Storage Instructions
Store: Brisket actually gets better after a day or two in the fridge! Let it cool completely, then store it in an airtight container with all those delicious juices for up to 4 days. I like to slice it cold before reheating since it’s easier to get nice, even slices that way.
Freeze: This freezes really well for up to 3 months. You can freeze it whole or already sliced, just make sure to include plenty of the cooking liquid to keep it moist. I usually portion it out into smaller containers so I can thaw just what I need.
Reheat: The best way to reheat brisket is low and slow in the oven at 325°F, covered with foil and a splash of broth to keep it from drying out. It usually takes about 20-30 minutes depending on how much you’re warming up. You can also reheat individual portions in the microwave with a damp paper towel over the top.
| Preparation Time | 30-40 minutes |
| Cooking Time | 210-240 minutes |
| Total Time | 480-540 minutes |
| Level of Difficulty | Medium |
| Servings | 8 servings |
Estimated Nutrition
Estimated nutrition for the whole recipe (without optional ingredients):
- Calories: 3200-3600
- Protein: 210-240 g
- Fat: 195-220 g
- Carbohydrates: 90-115 g
Ingredients
- 4 large yellow onions (thinly sliced into half-moons)
- 6 garlic cloves, coarsely chopped
- 2 large carrots (peeled and cut into 1-inch chunks)
- 4 lb brisket
- 2 1/4 tsp kosher salt
- 2 tbsp King Arthur all-purpose flour
- 3 tbsp Wesson vegetable oil
- 2 1/2 cups Swanson chicken broth
- 2 tbsp tomato paste
- 1 tbsp paprika
- 3/4 tsp white pepper
- 1 tbsp brown sugar
- 3 sprigs fresh thyme
Step 1: Prepare Mise en Place and Season the Brisket
- 4 large yellow onions
- 6 garlic cloves, coarsely chopped
- 2 large carrots
- 4 lb brisket
- 2 1/4 tsp kosher salt
- 2 tbsp King Arthur all-purpose flour
Preheat your oven to 375°F.
While it heats, thinly slice the onions into half-moons, coarsely chop the garlic cloves, and cut the carrots into 1-inch chunks.
Pat the brisket dry with paper towels, then season all sides generously with kosher salt.
Dust the seasoned brisket evenly with flour on all sides—this helps create a flavorful crust when seared.
Step 2: Sear the Brisket to Build Flavor
- 3 tbsp Wesson vegetable oil
- seasoned and floured brisket from Step 1
Heat the vegetable oil in a large, heavy-bottomed pot or Dutch oven over medium-high heat until shimmering.
Carefully place the floured brisket in the hot oil and sear for 5-10 minutes per side until deeply browned on both surfaces.
This browning develops the rich, savory foundation of the dish.
Transfer the seared brisket to a plate and set aside.
Step 3: Build the Braising Liquid Base
- sliced onions from Step 1
- 2 1/2 cups Swanson chicken broth
- 2 tbsp tomato paste
- 1 tbsp paprika
- 3/4 tsp white pepper
- 1 tbsp brown sugar
In the same pot with the oil remaining from searing, add the sliced onions and sauté for about 5 minutes, stirring occasionally, until they begin to soften and become translucent.
Pour in the chicken broth, scraping up any flavorful browned bits from the bottom of the pot with a wooden spoon.
Stir in the tomato paste, paprika, white pepper, and brown sugar until fully combined and the mixture is smooth.
Step 4: Braise the Brisket at High Temperature
- seared brisket from Step 2
- braising liquid from Step 3
- chopped garlic from Step 1
- carrot chunks from Step 1
- 3 sprigs fresh thyme
Return the seared brisket to the pot, nestling it into the braising liquid.
Scatter the chopped garlic and carrot chunks around and on top of the meat.
Add the fresh thyme sprigs for aromatic depth.
Cover the pot with a lid and transfer to the preheated 375°F oven.
Braise for 1 1/2 hours—I like to check it halfway through to ensure the liquid is gently simmering, not boiling vigorously.
Step 5: Lower Heat and Slice for Second Braise
- partially cooked brisket from Step 4
Remove the pot from the oven and carefully lift out the brisket onto a cutting board.
Reduce the oven temperature to 325°F.
Once the brisket has cooled slightly, slice it against the grain into 1/4-inch thick slices—slicing against the grain ensures tender, easy-to-eat pieces rather than chewy strands.
Return the sliced brisket to the pot, arranging the slices in an overlapping pattern and submerging them in the braising liquid.
Step 6: Complete the Braise and Finish
- sliced brisket in braising liquid from Step 5
Cover the pot again and return it to the oven at 325°F for another 1 1/2 hours, which allows the sliced meat to fully tenderize and absorb all the braising flavors.
After this time, remove the pot from the oven and skim off any visible fat from the surface of the braising liquid using a spoon or fat separator.
Increase the oven temperature to 350°F, cover the pot again, and bake for a final 45 minutes to bring everything to serving temperature and allow the flavors to meld beautifully.

Classic Grandpa's Brisket Recipe
Ingredients
Method
- Preheat your oven to 375°F. While it heats, thinly slice the onions into half-moons, coarsely chop the garlic cloves, and cut the carrots into 1-inch chunks. Pat the brisket dry with paper towels, then season all sides generously with kosher salt. Dust the seasoned brisket evenly with flour on all sides—this helps create a flavorful crust when seared.
- Heat the vegetable oil in a large, heavy-bottomed pot or Dutch oven over medium-high heat until shimmering. Carefully place the floured brisket in the hot oil and sear for 5-10 minutes per side until deeply browned on both surfaces. This browning develops the rich, savory foundation of the dish. Transfer the seared brisket to a plate and set aside.
- In the same pot with the oil remaining from searing, add the sliced onions and sauté for about 5 minutes, stirring occasionally, until they begin to soften and become translucent. Pour in the chicken broth, scraping up any flavorful browned bits from the bottom of the pot with a wooden spoon. Stir in the tomato paste, paprika, white pepper, and brown sugar until fully combined and the mixture is smooth.
- Return the seared brisket to the pot, nestling it into the braising liquid. Scatter the chopped garlic and carrot chunks around and on top of the meat. Add the fresh thyme sprigs for aromatic depth. Cover the pot with a lid and transfer to the preheated 375°F oven. Braise for 1 1/2 hours—I like to check it halfway through to ensure the liquid is gently simmering, not boiling vigorously.
- Remove the pot from the oven and carefully lift out the brisket onto a cutting board. Reduce the oven temperature to 325°F. Once the brisket has cooled slightly, slice it against the grain into 1/4-inch thick slices—slicing against the grain ensures tender, easy-to-eat pieces rather than chewy strands. Return the sliced brisket to the pot, arranging the slices in an overlapping pattern and submerging them in the braising liquid.
- Cover the pot again and return it to the oven at 325°F for another 1 1/2 hours, which allows the sliced meat to fully tenderize and absorb all the braising flavors. After this time, remove the pot from the oven and skim off any visible fat from the surface of the braising liquid using a spoon or fat separator. Increase the oven temperature to 350°F, cover the pot again, and bake for a final 45 minutes to bring everything to serving temperature and allow the flavors to meld beautifully.